
Create an Excel 2007 VSTO add-in: the Ribbon
22 Feb 2010Excel VSTO Add-In Series
- Getting Started
- Custom Task Pane
- Ribbon
- WPF Control
- Tree View
- Excel Events
- Part 1 Wrap
- Go To Cell
- Read Worksheets
- Display Differences
- Msi Installer
- Code on GitHub
In our previous installment, we went through adding a Custom Task Pane to Excel to host the user interface of our VSTO add-in. However, we left off with one problem to solve. The task pane is shown when the add-in starts up, but if the user closes it, there is no mechanism to show it again. We will resolve that problem by using the ribbon, adding a button that restores the task pane visibility.
First, we will create a new folder in our project, called “Ribbon”. Right-click the folder, select Add > New Item, and pick Ribbon (Visual Designer) from the available templates. We will call our ribbon “AnakinRibbon”.
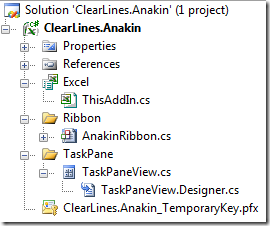
By now, your solution should look like this:
Visual Studio displays a visual interface, representing the ribbon we will use for Anakin:

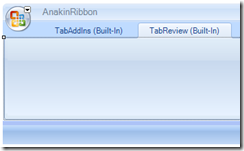
By default, the ribbon comes pre-populated with a tab called “TabAddIns”, labeled Built-In. This reflects the fact that, by default, your add-in ribbon will show up in the standard Add-Ins tab of the ribbon.
While this would be perfectly acceptable, we actually want to add our add-in to an existing Ribbon tab, the “Review” tab. It seems like a natural place to find functionality related to comparing different versions of a spreadsheet, and this way, we can avoid crowding the Ribbon with new tabs, and integrate seamlessly with Office, without minimal disturbance to the user experience.
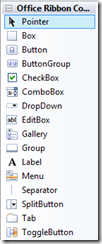
First, we will add a new Tab to our Ribbon. Expanding the Office Ribbon Controls section in the Toolbox reveals the set of controls we can use, most of them familiar.
Grab the Tab control, and drag it over the Ribbon (or right-click the Ribbon, and select Add Ribbon Tab). A new tab shows up, which is not marked as built-in. If you hit F5 at that point, you will see two things: the Add-Ins tab now contains an empty group (the group that is created by default), and a new tab has been created for us, where we could add controls if we wanted to use a custom tab.
First let’s hook up the new tab, so that its contents show up in the Review tab, instead of inside a new one. To do this, we need to provide the Tab with the Id of the built-in Excel tab it will be hosted in. Select the tab, and in the Properties window, modify the ControlIdType from “Custom” to “Office”, to indicate you want to use a built-in office tab, and type in “TabReview” in the OfficeId field.
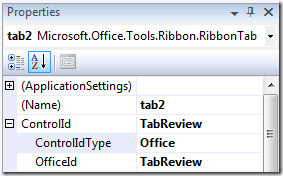
Once this is done, the display of the Tab will change to TabReview (Built-In), indicating that the Ribbon recognized what we wanted to do. Each control built in the Ribbon has an Id, which you need to use if you want to access it – the complete list, for all Office applications, can be found here
Next, let’s create a Group for our add-in, change its Label to Anakin, and drag a Button to the group, which we will label “Compare”.
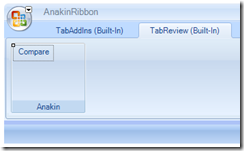
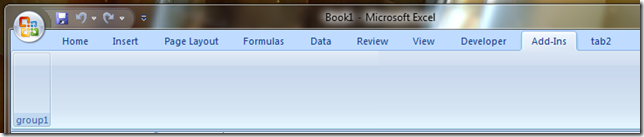
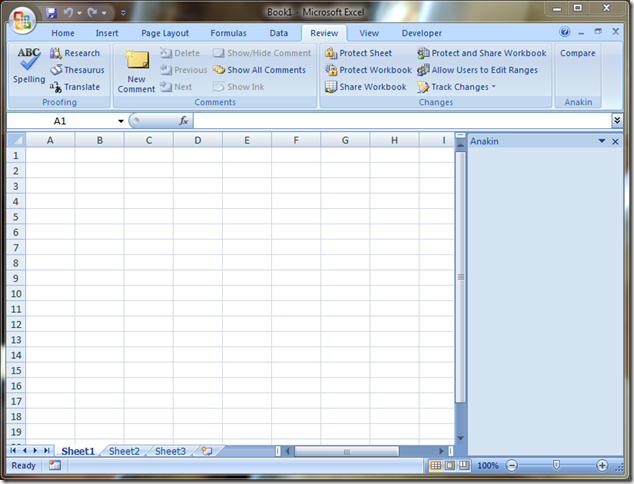
Hit F5 to debut the project, you should see something like this, with the Review tab now containing our group and button.
Now let’s add some code, so that when the button is clicked, the Custom Task Pane visibility is set to true. First, we need to make the TaskPane property accessible, so we change the corresponding property on the ThisAddIn class from private to internal:
public partial class ThisAddIn
{
    private CustomTaskPane taskPane;

    internal CustomTaskPane TaskPane
    {
        get
        {
            return this.taskPane;
        }
    }
On the Ribbon, double-click on the button. An empty event handler is created for you – let’s add the following code to it:
private void ShowAnakin_Click(object sender, RibbonControlEventArgs e)
{
    Globals.ThisAddIn.TaskPane.Visible = true;
}
The Globals class exposes an internal static property ThisAddin, which provides access to the Add-In from anywhere within the add-in solution. We use it to navigate to the TaskPane, and make it visible whenever the button is clicked.
Let’s make a small modification, so that by default the task pane is hidden:
private void ThisAddIn_Startup(object sender, System.EventArgs e)
{
    var taskPaneView = new TaskPaneView();
    this.taskPane = this.CustomTaskPanes.Add(taskPaneView, "Anakin");
    this.taskPane.Visible = false;
}
The last thing we have to do is to remove the default add-in tab and its group from the ribbon. Open the AnakinRibbon designer, right-click on the AddInTab area, and delete – and we are done.
Now that our hooks are in place, we can begin to add some real functionality to our add-in. In the next installment, we will work on adding a tree view to the Custom Task Pane, so that the user can select which of the currently open worksheets he/she wants to run a comparison against. We will use WPF for that control – because the WPF tree view control is great, and because the ability to use WPF in Office Applications is a fantastic feature!
Resources
List of the built-in ribbon tabs